project:PRJ-2-Gate-QuartzBlog log:PRJ-2-Log-QuartzBlog
简介
记录一下自己基于 quartz 搭建博客的过程。
正文
(2024-11-29) ⇒
新建项目!准备记录一下我的 QuartzBlog 的搭建,以及整个过程中遇到的问题呀之类的。
首先,这个项目是基于 quartz 项目为基础构建,后续一定会根据自己的需求去修改、添加插件以实现我的需求。
首先来看官方的文档
- 克隆、下载项目
- 下载包
- 编译、运行
git clone https://github.com/jackyzha0/quartz.git
cd quartz
npm i
npx quartz create
(2024-12-04) ⇒
新签出一个分支做自己的修改,避免更新以后下拉冲突。
上面的 npx quartz create 里面有3中放文章的方法:
- 空
- 复制
- 软链接
上传我的内容之前,我肯定是需要在 quartz 中查看当前的展示效果的,而且我也不希望总是去手动复制来增加我的管理开销,于是我是用软链接去链接 content 和我要上传的知识库文件夹。
因为要上传的部分在知识库中是不同的文件夹嘛,受到它软链接的启发,我 unlink 了 content ,把我需要上传的文件夹分别 ln -s 链接进来,以及主页的 index.md 单独链接过去。这样我的知识库中就不需要做任何的调整、修改。
quartz 在 build 的时候会自动将 content 中,软链接链接的文件丢进去 build 出一个个 html,相当不错!
考虑到我的文章中是有很多图片的(正常截图 or 表情包),这些东西貌似直接放到 dist 作为项目丢上去有点不太好,于是我决定给它丢到我的 cloudflare 中的免费 R2 中。
既然图片会丢到 cloudflare 中,那势必需要修改文章中图片的链接,将其指向 R2。所以这里在刚才新分支的基础上又签出了一个新的Release分支,用于做 build 和 上传。
现在则需要考虑在什么地方去遍历、上传图片。
我的表情包呀、其他图片一类的东西,在我的文章中是使用双链链接的。表情包是我自己写的插件插入,它是类似于这样的格式:[[文件夹/1.png]]。也就是说,如果我先移动文章再去上传,路径发生变化,可能无法正确检索到 文件夹/ 这么一个路径。所以必须是在转移文件之前去做这部分处理。
为此写了一个脚本负责遍历我待上传的所有文件(文本中属性内有是否公开属性)。
- 将 quartz 分支切换为 Release 分支
- 以当前文件夹为所有图片做索引(最短形式、相对路径形式、根路径形式)
- 遍历文件夹找属性中
public为 true 的文章- 复制文章至目标文件夹
- 处理文章中所有图片()
- 上传
- 拿到 url
- 替换
我本地的知识库也是用 git 管理,每当我本地知识库 post ,就调用上述脚本完成 Release 分支切换、全部待上传部分的文件复制,并且 build quartz 。
至此,quartz 的发布部分的逻辑就讲完了。
(2024-12-05) ⇒
现在的话需要首先去 R2 Buttle 去配置内容。
部署需要的资源上传呀、复制呀之类的完成了!
蚌埠住了,这个锤头不支持对外链图片的大小控制……
修复quartz中对外链图片的大小控制
淦!怎么这个锤头
quartz仅仅支持obsidian中的双链图片调整宽高啊!!蚌埠住了……参考了一下发现它对于双链链接的图片的处理是在
ofs.ts(ObsidianFlavoredMarkdown) 中。因为咱们默认应用的就是 obsidian 风格的插件嘛。这是它匹配双链语法的部分:
// !? -> optional embedding
// \[\[ -> open brace
// ([^\[\]\|\#]+) -> one or more non-special characters ([,],|, or #) (name)
// (#[^\[\]\|\#]+)? -> # then one or more non-special characters (heading link)
// (\\?\|[^\[\]\#]+)? -> optional escape \ then | then one or more non-special characters (alias)
export const wikilinkRegex = new RegExp(
/!?\[\[([^\[\]\|\#\\]+)?(#+[^\[\]\|\#\\]+)?(\\?\|[^\[\]\#]+)?\]\]/g,
)
有样学样写一个匹配正常 markdown 外链的,因为我仅仅是想要将 alias 解析为长宽,所以就匹配
和啦~:这里得参考一下官方的这个图:
也就是说,
markdown文件优先在 TransFormers 处理。这部分大致有四种类型的:
textTransform:
- text → text
- 将文件解析为Markdown AST 之前 执行文本到文本的转换
markdownPlugins:
- markdown → markdonw
- 定义了一个remark插件列表(
remark是一个以结构化方式将 Markdown 转换为 Markdown 的工具)htmlPlugins:
- html → html
- 定义了rehype 插件列表(与
remark工作原理类似,rehype是一个以结构化方式将 HTML 转换为 HTML 的工具)externalResources:可能需要在客户端加载才能正常工作的任何外部资源export type QuartzTransformerPluginInstance = { name: string textTransform?: (ctx: BuildCtx, src: string | Buffer) => string | Buffer markdownPlugins?: (ctx: BuildCtx) => PluggableList htmlPlugins?: (ctx: BuildCtx) => PluggableList externalResources?: (ctx: BuildCtx) => Partial<StaticResources> }这里有个问题啊,貌似 markdown 原生语法是没办法直接在文本中识别、应用图片的宽高的,所以没办法在
textTransform类型的部分处理。碎碎念
虽然有点了解插件,但这个执行顺序给我看懵逼了哈哈哈哈~
太久没有在前端应用上debug了,这一点小玩意儿花了我好几个小时!!
太菜了!没能和GPT老哥聊明白~
考虑到咱们的 obsidian 本身就支持类似于
[alt|widthxheight](url)这种做法去限制图片大小,就直接在ofs.ts中加了对这部分的处理。quartz/plugins/transformers/ofs.ts } visit(tree, "image", (node) => { // 检查 alt 是否为有效字符串 if (typeof node.alt === "string" && node.alt.includes("|")) { // 匹配 alt 中的尺寸信息 (width 或 widthxheight) const match = node.alt.match(/\|(?<width>\d+)(?:x(?<height>\d+))?$/); if (match?.groups) { const { width, height } = match.groups; // 修改 hProperties,添加 width 和 height node.data = node.data || {}; node.data.hProperties = { ...node.data.hProperties, width: width || "auto", // 如果没有宽度,设置为 "auto" height: height || "auto", // 如果没有高度,设置为 "auto" }; // 去除 alt 中的尺寸信息 node.alt = node.alt.replace(/\|(?<width>\d+)(?:x(?<height>\d+))?$/, "").trim(); } } }); mdastFindReplace(tree, replacements)指向原始笔记的链接看各种形状的快乐小狗!


`` `` `` `` `` ``
上面代码块部分的效果部分(额外的 shikijs transform 部分),灵感来源来源于 icepro`s blog:为 quartz 添加额外 shikijs transform。具体使用方式可以参考这个: @shikijs/transformers 文档地址 。
(2024-12-06) ⇒
重新整理了一下我的图片检索、上传、替换脚本。
obsidian知识库公开部分迁移、图片上传、链接修正
整理一下我自己的 obsidian知识库公开部分迁移、图片上传、链接修正部分内容。
知识库部分迁移
使用知识库做记录的时间不多,我自己的知识库是相当乱的!这样的话就容易出现这样的情况:
最终需要的文件夹结构可能来自于多个不同文件夹中的内容
quartz在创建的时候会有3个选项,其中一个就是符号链接你需要的文件夹。这个确实是给了我灵感,于是我也用相同的方式,使用ubuntu 的符号链接链接我需要的文件夹,将其放入content文件夹内。这时候又有另一个问题:
知识库中通过双链链接资源文件,而站点中的资源文件应该向对象存储请求
也就是说,我不能直接使用符号链接来链接我的文件,而是需要将其原文件修改、文中的双链都需要改用常规
markdown 语法,并且资源链接指向对象存储OSS中。为此,我在我自己的知识库中的顶层文件夹中新增了一个
release文件夹,并且将需要上传的文件夹的符号链接放进去~这样知识库迁移只需要用脚本遍历知识库的release文件夹就能够做到了!要支持符号链接的话,需要在
os.walk()中添加参数followlinks=True# 查找属性 public 为 true 的文章 def find_public_articles(source_folder): public_articles = [] for root, dirs, files in os.walk(source_folder, followlinks=True): for file in files: if file.lower().endswith('.md'): file_path = os.path.join(root, file) with open(file_path, 'r', encoding='utf-8') as f: try: content = f.read() front_matter_match = re.match(r'^---\n(.*?)\n---\n', content, re.DOTALL) if front_matter_match: front_matter = yaml.safe_load(front_matter_match.group(1)) if front_matter and front_matter.get('public', False): public_articles.append(file_path) except yaml.YAMLError as e: print(f"YAML 解析错误在 {file_path}: {e}") continue return public_articles图片上传
考虑到我的图片引用有些是相对根路径,有些是最短路径,这里获取一下文件的最短路径和相对根路径
def map_files_to_shortest_and_relative_paths(source_folder):
    file_mapping = {}

    for root, dirs, files in os.walk(source_folder, followlinks=True):
        for file in files:
            # 获取文件的完整路径
            file_path = os.path.join(root, file)

            # 获取文件相对源文件夹的路径
            relative_path = os.path.relpath(file_path, source_folder)

            # 获取文件的最短路径(即文件名)
            shortest_path = file  # 文件名作为最短路径

            # 将最短路径和相对路径映射到实际路径
            file_mapping[shortest_path] = file_path
            file_mapping[relative_path] = file_path

    return file_mapping
上面已经拿到了所有需要的公开的文件,我们需要的是在文件中找到所有双链部分,将指向资源文件的部分上传。
嘛,主要是不希望公开的资源和自己私有的资源混合在一起
   def process_markdown_files_for_upload(self, resource_map, markdown_files, source_folder, map_dict):
        """
        处理一组 Markdown 文件,上传图片并构建本地路径到远端 URL 的映射。
        """
        for file_path in markdown_files:
            with open(file_path, 'r', encoding='utf-8') as f:
                content = f.read()

            # 使用正则表达式查找所有 ![[资源名称]] 或 ![[资源名称|xxx]]
            pattern = re.compile(r"(?P<image_marker>!?)(?:\[\[(?P<resource>[^\|\]]+)(?:\|(?P<alias>[^\]]+))?\]\])")

            matches = pattern.finditer(content)

            if not matches:
                print(f"未找到图片: {file_path}")
                continue

            for match in matches:
                resource_name = match.group("resource")
                # 查找 image_map 中的实际路径
                if resource_name in resource_map:
                    actual_path = resource_map[resource_name]
                    print(f"资源 {resource_name} 对应的实际路径: {actual_path}")
                else:
                    print(f"未找到资源 {resource_name} 对应的路径映射")
                    continue

                if not os.path.isfile(actual_path):
                    print(f"图片文件不存在: {actual_path}")
                    continue

                # 上传图片到 R2
                uploaded_url = self.r2_client.upload_image(actual_path)
                if uploaded_url:
                    # 使用 Unix 风格路径作为键
                    relative_unix_path = convert_to_unix_path(resource_name)
                    map_dict[relative_unix_path] = uploaded_url
                    print(f"已上传 {actual_path} 至 {uploaded_url}")
                else:
                    print(f"上传失败: {actual_path}")
将资源上传以后,复制文件。
为了防止资源文件仅仅修改了名字重复上传,这边是将上传的文件名替换为了它的 MD5
cloud flare的R2 oss是支持给文件加属性进去的,也可以直接加属性达到相同的效果啦~俺就是嫌麻烦了链接修正
这部分就重新匹配啦~匹配完以后,根据存下来的映射关系做替换就好了~
大概就下面这些是重点吧,将资源文件的双链替换为正常markdown支持的语法,并且保留
[name|alias](url)中alias对图片大小的控制(外链图片控制是在quartz中修改的,详见此文)def replace_match(match): # 提取通用部分 resource_name = match.group("resource") alias = match.group("alias") is_image = bool(match.group("image_marker")) # 获取 URL 映射路径 url = image_url_mapping.get(resource_name, resource_name) resource_name = resource_name.split("/")[-1] # 判断是图片还是普通链接 if is_image: if alias: # 检查 alias 是否是指定格式(纯数字 或 数字x数字 或 x数字) if re.fullmatch(r"(\d+|\d+x\d+|x\d+)", alias): return f"" else: return f"" else: return f"" else: if alias: return f"[{alias}]({url})" else: return f"[{resource_name}]({url})" # 定义正则表达式,捕获所有双链格式 pattern = re.compile( r"(?P<image_marker>!?)(?:\[\[(?P<resource>[^\|\]]+)(?:\|(?P<alias>[^\]]+))?\]\])" ) new_content = pattern.sub(replace_match, content)指向原始笔记的链接碎碎念
淦,写着写着就感觉不太对了,貌似我没必要刷两次文本!
也就是说,直接复制文件,然后用知识库的map刷一遍就好了……
下次再说~
(2024-12-07) ⇒
尝试部署了!!!
咱只要把生成的dist文件丢上去就好了~先去看看官方教程!
恩……果然还是直接丢上去让它来构建最轻松了……
quartz部署github page
部署
github page及 自动化构建
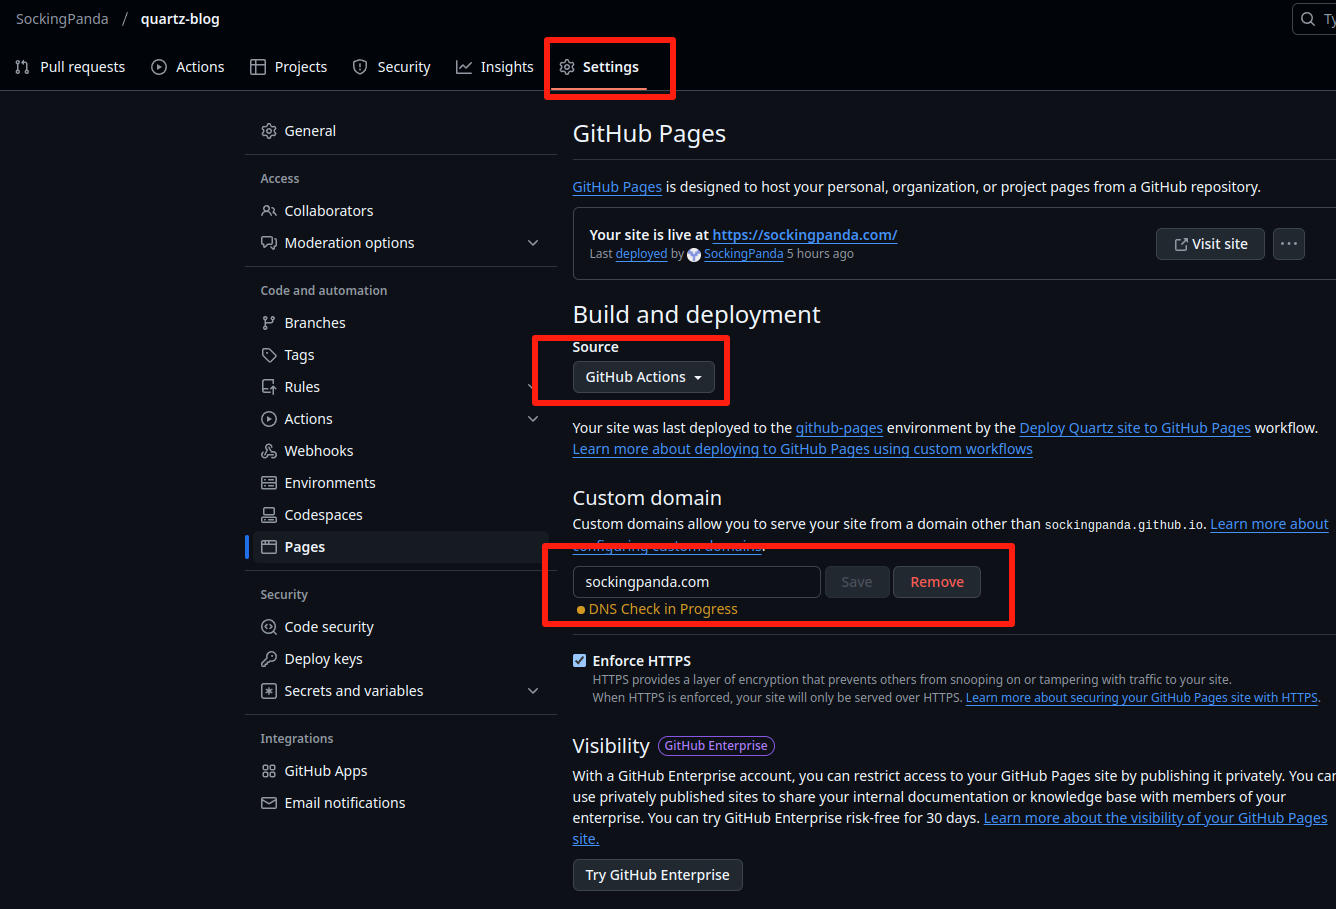
github repo中的setting里面的page项,添加action。
action部分是参考官方的教程,大致就是:读哪个分支,在什么环境、工具构建,最终产物放在哪儿。.github/workflows/depoly.yml name: Deploy Quartz site to GitHub Pages on: push: branches: - Release # 触发条件修改为 Release 分支 permissions: contents: read pages: write id-token: write concurrency: group: "pages" cancel-in-progress: false jobs: build: runs-on: ubuntu-22.04 steps: - uses: actions/checkout@v4 with: fetch-depth: 0 # Fetch all history for git info - uses: actions/setup-node@v4 with: node-version: 22 - name: Install Dependencies run: npm ci - name: Build Quartz run: npx quartz build - name: Upload artifact uses: actions/upload-pages-artifact@v3 with: path: public deploy: needs: build environment: name: github-pages url: ${{ steps.deployment.outputs.page_url }} runs-on: ubuntu-latest steps: - name: Deploy to GitHub Pages id: deployment uses: actions/deploy-pages@v4玩事儿了以后,这个
on.push.branches的分支一旦更新,就会自动完成后续工作,完成自动化构建。添加自定义域名
这里得保证你自己有自己的域名哇~没有的话可以忽略这一步了~
在自己的
DNS上加上:
- 185.199.111.153
- 185.199.110.153
- 185.199.109.153
- 185.199.108.153
还得把代理状态改成
指向原始笔记的链接仅DNS(橙色的改成灰色的)


